celty sturluson | durarara!! – helmet walkthrough
Posted on: October 30, 2010
- In: props
- 17 Comments
Since I finished this a wee while ago and went through a rather amazing amount of trial and error, I thought I’d write up a bit about the process so, if anyone comes across this, they don’t need to suffer the same amount I did from my own stupidity. First of all, this was what I was aiming for;

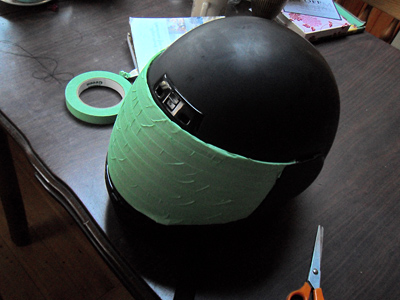
Since this costume was supposed to be quick and easy (hahahsdlfkjalsdk), I lacked the time and skills to make a helmet that good from scratch, so instead I bought a plain black helmet from NZ’s local auction site, TradeMe. As far as brand goes, I have no idea what it was, but it was a size L which seemed to a.) fit my head okay (not that I think I have a particularly… large head), and b.) gave sufficient room to balance the weight of the additions to it. The visor was clear, but that’s a horror story I’ll go into later in this post! So, here’s the not-so-wee helmet before I start mangling it;

Sensibly, I thought the first task would be to mask anything I didn’t want dust/spraypaint/various crap on, which actually turned out to be a good idea. I MUST STRESS THOUGH, please buy good quality painter’s tape! I bought some cheapo green crap and the spraypaint bled underneath it because it didn’t stick well enough, so make sure you clean the surface you’re attaching it to and actually get decent tape. Otherwise, there’ll be bleeding everywhere, and not the normal kind. Masking away! Definitely take the time to get all the annoying wee corners and stuff on the edges of the visor– you’ll thank yourself later. In hindsight, I should’ve also masked the vents on the helmet– the black rectangle above the visor– because if you don’t and you begin spraypainting, you’ll be breathing in spraypainting fumes forever. Seriously, they never go away.
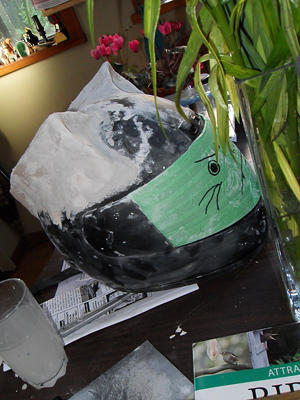
The ears were the next task. To be honest, they were what scared me the most about this whole thing because I have this terror of how expensive good materials are, and being a university student one always tries to do things cheaply (often to one’s downfall)– so I decided to go with paperclay. I used two types; a putty-like one to do the bulk of the ears and a grainer one you could easily see the paper fibres in to cover it with. Hence spending hours standing in front of the stupid thing trying to see whether they’re symmetrical, asking the opinion of anyone easily accessible, etc. I found it a lot easier to judge evenness after I put a strip of painter’s tape down the middle of the helmet– it worked wonders. Some rather ugly progress photos; see how lumpy and cracked it is!
The putty clay stage.
Covering it with the harder, more resilient grainy clay.
(Incidentally, drawing a face on the tape makes the helmet go faster.)
It was about this stage that a few tears were shed. Happily, I’d sculpted it to perfection, then I came back the next day and there were cracks. Obviously I had forgone the thought that paperclay shrinks when it dries, simply because of the moisture in the material– but all was not lost! I just patiently filled it in with more clay, waited for it to dry and all was fine again. I did find the putty clay took a lot longer to dry than the grainy clay though, which was rather annoying. After finally getting this done, it was time to sand FOREVER. If you can, wear gloves when you sand– I did mine with my barehands and accidentally sanded most of the skin off of my index finger, which ended up being more sore than I thought it would. Be prepared for a gratuitous amount of sanding, so if you have a mouse sander… go for that. Then it was a matter of priming the surface!
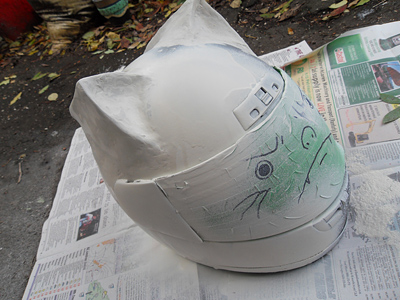
IT’S SNOWING
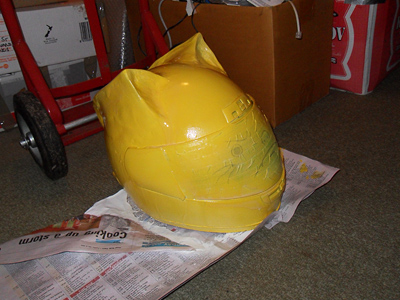
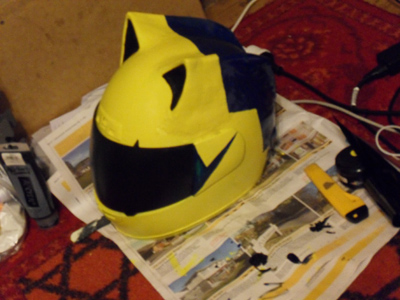
… for some reason, I love primer. It makes everything look neater. But because it was windy, I also ended up primering part of our backyard, too. Envious of people with garages! After primering and sanding, spraypainting. I’ll just say now, I am NEVER using gloss enamel spraypaint for anything I do ever again. I used it on this helmet and it was an absolute nightmare. Probably my inexperience and part doin’-it-wrong but the paint ran, it took forever to dry (in fact, it’s still a bit sticky, and I made this helmet in July), it mixed with the blue and just… was extremely ragequit inducing. Definitely going for acrylic next time.
First coat of yellow!
After the yellow coat was done, it was time for the blue accents. I masked the outline of what I wanted with this awesome cruddy painter’s tape (which, at this point, I thought was amazing), and did a few lines back– which wasn’t enough. Mask the whole thing if you’re spraypainting outside, or attach a plastic bag to the edges of the tape so no paint will mix because it is a TERROR trying to get it back off again, especially on a short time frame. So, I merrily did my blue coats, but– SHOCK, HORROR.
More tears are shed. There was no way I could touch this up with spraypaint, so in the end I just went over the edges a million times with an acrylic and a brush– which is also what I used to do the blue accents and ‘S’ detail on the front, and the black in the vents at the back. It was tedious, but it worked, and in cosplay? That’s all that matters.
Mid-painting!
As you can see here, the visor is black. Not because it’s tinted– because I got fed up and painted it black with acrylic. Originally, I had this awesome idea that I could put that limo window tint on the clear visor and just squeegee it on, but it didn’t occur to me that the surface was actually rounded, unlike a car window, and that plan failed, miserably. I suggest, if you buy a helmet without a tinted visor, just BUY a tinted a visor. It will save years off of your life and they’re not difficult to install. Plus, you’ll be able to see in it, unlike me and my helmet (to some degree).
OKAY, SOME TIPS.
– When spraypainting, make sure you’re keeping the lever action of the visor free. It’s important to be able to put it up and once spraypaint dries, hard to budge it.
– Only use gloss enamel spraypaint if you’re less of an idiot than me.
– I wanted a third tip.
In the end, I was pretty pleased with the thing– but it was an emotional ordeal. And so ends my first blog post!
chekkit mah ipod touch
17 Responses to "celty sturluson | durarara!! – helmet walkthrough"
Hellllllooo. I was wondering, how much did the helmet and stuff cost, what spraypaint, primer, paper clay did you use if you remember 8D? I’m wanting to make one myself, and yours looks AMAZING ❤
May I ask…how many days did this take? ALSO! where did you get the rest of your cosplay? :O
I am going to attempt this for my dragon con costume. i got the helmet today and begin on the ears tomorrow….wish me luck!
I’m sooo gonna fail at this ;-; I’m worried. What if we buy a plain yellow helmet? would that work? a thought about the yellow helmet though: what if we cant find the right color?




October 30, 2010 at 11:31 am
Man, this is so cool! It’s awesome to see how you did the ears – I can’t wait to try my hand at a Celty helmet 🙂
❤ ❤ ❤
November 1, 2010 at 2:01 pm
you will be such an amazing celty! <3333